15 KiB
| title | sidebar_label |
|---|---|
| Basic Setup | Basic Setup |
import Tabs from '@theme/Tabs'; import TabItem from '@theme/TabItem';
export const OsTabs = (props) => (<Tabs groupId="operating-systems" defaultValue="debian" values={[ {label: 'Debian/Ubuntu', value: 'debian'}, {label: 'Windows', value: 'win'}, {label: 'macOS', value: 'mac'}, {label: 'Raspberry OS', value: 'raspberryos'}, {label: 'Fedora', value: 'fedora'}, {label: 'VS Code & Docker', value: 'docker'}, ] }>{props.children});
Prerequisites
ZMK requires the following base packages to first be installed:
- Git
- Python 3
pipwget- devicetree compiler
- CMake
dfu-util- Various build essentials, e.g. gcc, automake, autoconf
On Debian and Ubuntu, we'll use apt to install our base dependencies:
First, if you haven't updated recently, or if this is a new install, you should update to get the latest package information:
sudo apt update
With the latest package information, you can now install the base dependencies:
sudo apt install -y \
	git \
	wget \
	autoconf \
	automake \
	build-essential \
	bzip2 \
	ccache \
	device-tree-compiler \
	dfu-util \
	g++ \
	gcc \
	libtool \
	make \
	ninja-build \
	cmake \
	python3-dev \
	python3-pip \
	python3-setuptools \
	xz-utils
:::note
Recent LTS releases of Debian and Ubuntu may include outdated CMake versions. If the output of cmake --version is older than 3.15, upgrade your distribution (e.g., from Ubuntu 18.04 LTS to Ubuntu 20.04 LTS), or else install CMake version 3.15 or newer manually (e.g, from Debian backports or by building from source).
There is also a zephyr bug with cmake 3.19.x. You'll need a version below 3.19. :::
On Raspberry OS, we'll use apt to install our base dependencies:
First, if you haven't updated recently, or if this is a new install, you should update to get the latest package information:
sudo apt update
With the latest package information, you can now install the base dependencies:
sudo apt install -y \
	git \
	wget \
	autoconf \
	automake \
	build-essential \
	bzip2 \
	ccache \
	device-tree-compiler \
	dfu-util \
	g++ \
	gcc \
	libtool \
	make \
	ninja-build \
	cmake \
	python3-dev \
	python3-pip \
	python3-setuptools \
	xz-utils
On Fedora, we'll use dnf to install our base dependencies:
DNF Update
First, if you haven't updated recently, or if this is a new install, you should update to get the latest package information:
sudo dnf update
Install Dependencies
With the latest package information, you can now install the base dependencies:
sudo dnf install -y \
	git \
	wget \
	autoconf \
	automake \
	bzip2 \
	ccache \
	dtc \
	dfu-util \
	g++ \
	gcc \
	libtool \
	make \
	ninja-build \
	cmake \
	python3-devel \
	python3-pip \
	python3-setuptools \
	xz
:::note
Use cmd.exe with these instructions rather than PowerShell.
:::
Chocolatey is recommended and used for the following instructions. You can manually install each of these applications and add them to your PATH if you don't want to use Chocolatey.
- Install Chocolatey
- Open
cmd.exeas Administrator - Run the following
chococommands:choco install cmake --installargs 'ADD_CMAKE_TO_PATH=System' choco install ninja gperf python git
It is recommended to install dfu-util to avoid any later confusion while flashing devices. You can do this by running this command with chocolatey:
choco install dfu-util
Homebrew
Homebrew is required to install the system dependencies. If you haven't done so, visit Homebrew for instructions. Once installed, use it to install the base dependencies:
brew install cmake ninja python3 ccache dtc git wget dfu-util
This setup leverages the same image which is used by the GitHub action for local development. Beyond the benefits of dev/prod parity, this approach is also the easiest to set up. No toolchain or dependencies are necessary when using Docker; the container image you'll be using already has the toolchain installed and set up to use.
- Install Docker Desktop for your operating system.
- Install VS Code
- Install the Remote - Containers extension
:::info
The docker container includes west and the compilation toolchain. If you're using docker and VS Code, you can skip right to Source Code.
:::
Setup
West Installation
west is the Zephyr™ meta-tool used to configure and build Zephyr™ applications.
West can be installed by using the pip python package manager. The Zephyr™ instructions are summarized here:
<Tabs defaultValue="linux" values={[ {label: 'Linux', value: 'linux'}, {label: 'Windows', value: 'win'}, ]}>
pip3 install --user -U west
In cmd.exe as Administrator:
pip3 install -U west
:::note
For Windows, do not use the --user argument that Linux uses otherwise west will be installed in a different location and the below instructions for adding Python pip will no longer apply.
:::
Once west is installed, close Command Prompt and open a new session as a user for the remainder of the instructions.
:::danger pip user packages
If you haven't done so yet, you may need to add the Python pip package directory to your PATH otherwise your computer will not be able to find the west command.
:::
<Tabs defaultValue="linux" values={[ {label: 'Linux', value: 'linux'}, {label: 'Windows', value: 'win'}, ]}> Run the following commands:
echo 'export PATH=~/.local/bin:"$PATH"' >> ~/.bashrc
source ~/.bashrc
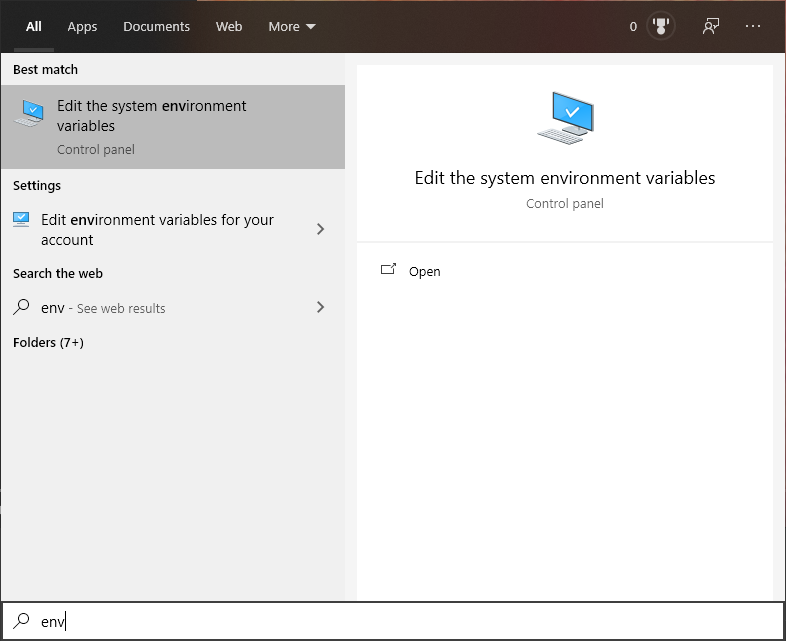
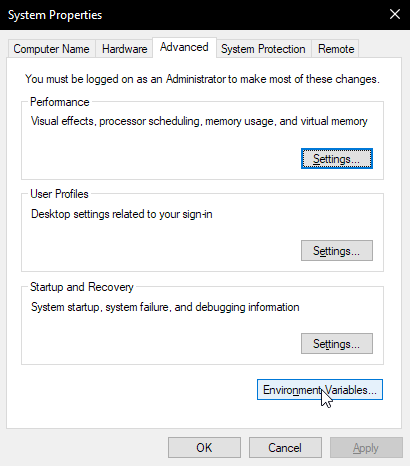
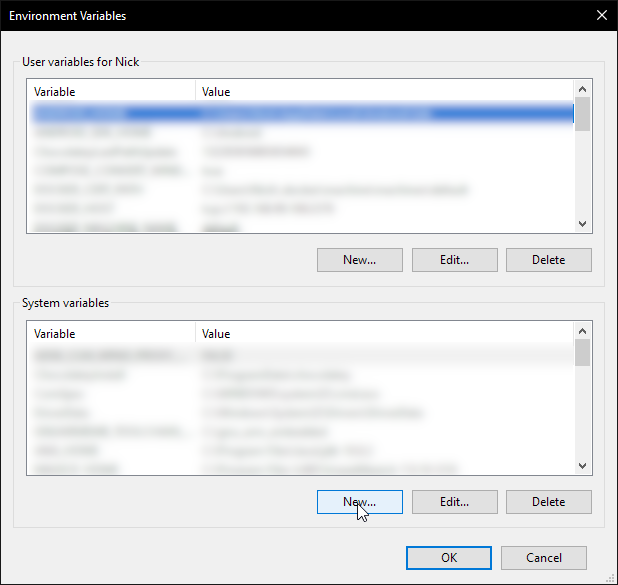
- See the Environment Variables section on how to get to the Environment Variables page.
- Under "System variables" select the "Path" variable. Click "Edit..." and then "New" to add the directory where your
west.exeis located. By default this should beC:\Python##\Scriptswhere ## is your Python version number. - Close Command Prompt and open a new session for the changes to take effect, or run
refreshenv.
Toolchain Installation
The toolchain provides the compiler, linker, etc., necessary to build for the target platform.
Zephyr™ ARM SDK
To build firmwares for the ARM architecture (all supported MCUs/keyboards at this point), you'll need to install the Zephyr™ ARM SDK to your system:
export ZSDK_VERSION=0.12.4
wget -q "https://github.com/zephyrproject-rtos/sdk-ng/releases/download/v${ZSDK_VERSION}/zephyr-toolchain-arm-${ZSDK_VERSION}-x86_64-linux-setup.run" && \
	sh "zephyr-toolchain-arm-${ZSDK_VERSION}-x86_64-linux-setup.run" --quiet -- -d ~/.local/zephyr-sdk-${ZSDK_VERSION} && \
	rm "zephyr-toolchain-arm-${ZSDK_VERSION}-x86_64-linux-setup.run"
The installation will prompt with several questions about installation location, and creating a default ~/.zephyrrc for you with various variables. The defaults should normally work as expected.
Because Raspberry OS (Raspbian) runs on the same architecture (but different ABI) as the keyboard MCUs, the operating system's installed cross compilers can be used to target the different ABI.
First, the cross compiler should be installed:
sudo apt install gcc-arm-none-eabi
Next, we'll configure Zephyr™ with some extra environment variables needed to find the cross compiler by adding the following to ~/.zephyrrc:
export ZEPHYR_TOOLCHAIN_VARIANT=cross-compile
export CROSS_COMPILE=/usr/bin/arm-none-eabi-
Zephyr™ ARM SDK
To build firmwares for the ARM architecture (all supported MCUs/keyboards at this point), you'll need to install the Zephyr™ ARM SDK to your system:
export ZSDK_VERSION=0.12.4
wget -q "https://github.com/zephyrproject-rtos/sdk-ng/releases/download/v${ZSDK_VERSION}/zephyr-toolchain-arm-${ZSDK_VERSION}-x86_64-linux-setup.run" && \
	sh "zephyr-toolchain-arm-${ZSDK_VERSION}-x86_64-linux-setup.run" --quiet -- -d ~/.local/zephyr-sdk-${ZSDK_VERSION} && \
	rm "zephyr-toolchain-arm-${ZSDK_VERSION}-x86_64-linux-setup.run"
The installation will prompt with several questions about installation location, and creating a default ~/.zephyrrc for you with various variables. The defaults should normally work as expected.
GNU ARM Embedded
Since the Zephyr™ SDK is not available for Windows, we recommending following the Zephyr documentation to install a GNU ARM Embedded build. Note the warnings regarding installing the toolchain into a path with spaces, and make sure to follow the steps to add the environment variables which are also summarized with screenshots in the Environment Variables section below.
GNU ARM Embedded
Since the Zephyr™ SDK is not available for macOS, we recommending following the steps to install the GNU ARM Embedded.
The install command is:
brew install --cask gcc-arm-embedded
:::warning Security Controls Workaround
Please be sure to read the additional setup instructions needed to address security controls found in macOS 10.15 Catalina and newer
:::
:::note If you intend to build firmware straight away, make sure to correctly setup the current shell.
Notes on setting this up can be found in the Environment Variables section. The transient instructions can be used to setup the current shell, and the automatic instructions can setup any newly made shells automatically.
The transient instructions must be run to build firmware using the current shell. :::
Source Code
Next, you'll need to clone the ZMK source repository if you haven't already. Navigate to the folder you would like to place your zmk directory in and run the following command:
git clone https://github.com/zmkfirmware/zmk.git
Initialize & Update Zephyr Workspace
Since ZMK is built as a Zephyr™ application, the next step is
to use west to initialize and update your workspace. The ZMK
Zephyr™ application is in the app/ source directory:
Step into the repository
cd zmk
cd zmk
cd zmk
cd zmk
cd zmk
Open the zmk checkout folder in VS Code. The repository includes a configuration for containerized development, so an alert will pop up:
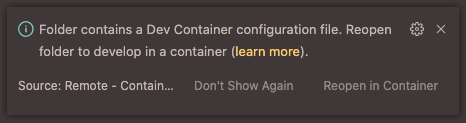
Click Reopen in Container in order to reopen the VS Code with the running container.
The first time you do this on your machine, it will pull the docker image down from the registry and build the container. Subsequent launches are much faster!
:::caution All subsequent steps must be performed from the VS Code terminal inside the container. :::
Initialize West
west init -l app/
:::caution Command Not Found?
If you encounter errors like command not found: west then your PATH environment variable is likely
missing the Python 3 user packages directory. See the West Build Command
section again for links to how to do this
:::
Update To Fetch Modules
west update
:::tip This step pulls down quite a bit of tooling. Go grab a cup of coffee, it can take 10-15 minutes even on a good internet connection! :::
:::info If you're using Docker, you're done with setup! You must restart the container at this point. The easiest way to do so is to close the VS Code window, verify that the container has stopped in Docker Dashboard, and reopen the container with VS Code.
Once your container is restarted, proceed to Building and Flashing. :::
Export Zephyr™ Core
west zephyr-export
Install Zephyr Python Dependencies
pip3 install --user -r zephyr/scripts/requirements-base.txt
Environment Variables
<Tabs defaultValue="win" values={[ {label: 'Windows', value: 'win'}, {label: 'Other OS', value: 'other'}, ]}>
For GNU ARM Embedded on Windows
On Windows, only two environment variables need to be set for ZMK to build properly: ZEPHYR_TOOLCHAIN_VARIANT and GNUARMEMB_TOOLCHAIN_PATH.
- Open Start Menu and type 'env' to find the 'Edit the system environment variables' option. Open it.
- Click 'Environment Variables...'.
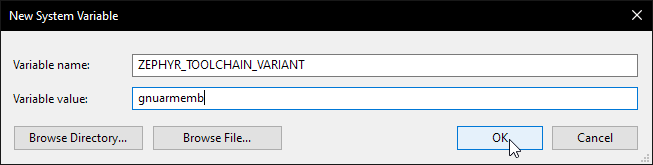
- Click "New..." under System variables to create a new system variable.
- Set the variable name to 'ZEPHYR_TOOLCHAIN_VARIANT' and value to 'gnuarmemb'. Click OK to save.
- Create another variable with variable name 'GNUARMEMB_TOOLCHAIN_PATH' and value set to wherever you installed your toolchain. Make sure this path does not contain any spaces. If it does, rename the folder and update here. Click OK to save.

- Close Command Prompt and reopen, or run
refreshenvto apply the changes.
For Zephyr
By default, the Zephyr™ SDK will create a file named ~/.zephyrrc with the correct environment variables to build ZMK.
We suggest two main options for how to load those settings.
Per Shell
To load the Zephyr environment properly for just one transient shell, run the following from your ZMK checkout directory:
source zephyr/zephyr-env.sh
All Shells
To load the environment variables for your shell every time,
append the existing ~/.zephyrrc file to your shell's RC file and then start a new shell.
<Tabs groupId="shell" defaultValue="bash" values={[ {label: 'bash', value: 'bash'}, {label: 'zsh', value: 'zsh'}, ] }>
cat ~/.zephyrrc >> ~/.bashrc
cat ~/.zephyrrc >> ~/.zshrc